Friday, April 26, 2013

My DIY fabric dahlia flower pin


Here is a super easy flower pin to make. It's actually a do-over of a DIY I did three years ago. Production values have gone way up at  Bromeliad since then, and the old became an embarrassment.

So for a spring frame of mind, I'm trying it again (even though technically dahlias are a late summer flower). This takes maybe 15 minutes. The key is picking the right fabric.


Cut a strip of light-weight non-fraying fabric that's four inches wide and as long as you like. Longer= bigger flower. Mine was as long as my tape measure and it made an aggressively enormous flower. You can piece shorter strips together.
 
Fold the fabric in half and cut slits every half inch or so. For a more dahlia shaped effect, you can taper the strips on the end if you've got the patience for that sort of thing.
 
Roll your strip and glue as you go. As you get near the last few wraps, cut your slits all the way to the end. You want the back of the pin to lay as flat as possible.
 
Cut a little circle from a plastic container and one or two fabric circles. Glue the plastic to the back of your brooch and glue fabric over it to cover the fact that your pin materials were taken from the trash. Glue a pin back above center and allow everything to dry.
 
Fluff the pin and wear if you dare. Vintage insect pin inserted onto the fabric brooch is optional. 

Thursday, April 25, 2013

Tulips


One advantage of the unseasonably cool weather in New York is that the tulips are sticking around longer than usual. I like them up close and very personal.

Here are a few in the neighborhood taken with a 50mm lens on normal and on backwards to turn it into a macro lens. I was really excited to discover the macro option until a friend at work informed me you can buy adapters for it and he had in fact built his own. I'm never on the front end of the curve.


Tuesday, April 23, 2013

Earth Day DIYs from nature


I'm a day late, but as readers of this blog are aware, every day is Earth Day at Bromeliad.
 
If you're in the market for an upcycled DIY, check out my DIY gallery, which is 90 percent stuff made from other stuff.

Today's roundup is a special kind of reuse - DIYs that come straight from the ground. In other words, the main ingredient is sticks, rocks, branches, bark - the free craft supplies of the great outdoors.
 

Painted stone statement rings from Alisa Burke.
Twig necklace from Plan B.
Gold twig bangles from A Pair and a Spare.
Ring from a rock from Creme de la Craft.
Birch bark lamps from Ruffled.
Driftwood orb at Creative in Chicago.
Painted stone ring at The Perfect Pear.
Stone pendants from Bromeliad.
Gold leaves on a backyard branch from Family Chic.
Twig wrap bracelet from Popsicles and Pinatas.

Wednesday, April 17, 2013

Pinned it / Wore It - Retro neutrals


Welcome to the latest installment of Pinned It/Wore it, where I try to wear my Pinterest Style board.
 
Today's inspiration comes from the photo below, which has been all over Pinterest lately although it's actually at least three years old, since I posted it on my blog in 2010, which qualifies as a classic look.  


Below is my version. Even as a less-than-exact match (no box pleats, no pullover, no bow) , it turned out to be an easy and wearable outfit.

 
My outfit is 100% thrifted, right down to those Marc Jacobs flats. Regrettably, a full skirt similar to the one in the inspiration photos is hard to come by, especially in white. Ironically, full skirts (an "older" style) are only available from retails who cater to younger women.
 
H&M had an awesome off-white full skirt as seen below on Laura at Buy Now Blog Later but it's sold out online. Maybe you can still pick one up in a store. It's not the same but you could also try this white jersey full skirt from American Apparel.


 Above are two more options: a striped skirt from Anthropologie and a black full skirt from ModCloth. A similar full skirt available in red, navy green and black at Asos.
 
Can you pull off a full skirt? How about a big bowed blouse?


Monday, April 15, 2013

Thrifted and gifted


A few favorite recent acquisitions.

Above, a lush floral I gifted to myself. Good floral is hard to find. Good cheap floral even more so. This is from the teenybopper store Rainbow. I paid $17 for it. There's a similar one on their website for $12.

Tip: Stuff never goes on sale at the Rainbow in Brooklyn. If you like it, buy it immediately.


To help you appreciate the coolness of this blouse, I present to you a list of somewhat similar blouses. Keep in mind, you could buy 65 Rainbow blouses for the price of one of these. Clockwise from left: Haute Hippie floral blouse at Piperlime, Love Moschino floral blouse, Dolce and Gabbana silk floral blouse, Vivienne Westwood floral blouse.

In the recently thrifted category would be my tapered Marc Jacobs bow flats, which were like new when I got them and has to be THE FIND of the season.


I tracked down a similar pair of Marc Jacobs flats for $620, which, if I had known, I would have had someone carry me from place to place whenever I have mine on.

Some more affordable bow flat and tapered flat options would be as follows:
  • Mel by Melissa Mel Stawberry black patent bow flats for $39 and free shipping.
  • Me Too Patty black bow flats for $54 and free shipping. (My friend who had ankle surgery swears by Me Too brand for comfort.)Widely regarded as a dead ringer for J.Crew's Viv flats.
  • JCP has bow flats for $35 and a whole series of tapered Worthington flats in various colors for $28. Can't speak to the comfort level.
Have you found any good deals lately?


Thursday, April 11, 2013

My DIY raw stone pendants


Mr. Bromeliad made these as gifts for his family from bits of stone and granite we picked up on the beach while in Thailand. Since most of the stones were granite and thus hard as a rock, he couldn't drill a hole in them very well. His workaround looks like a pretty good imitation of electroplating but doesn't require much in the way of tools.

To make similar  no-hole-required pendants from raw stones or crystals, you will need teardrop or flat-backed stones, solid-core solder (no acid flux) that you can get at a hardware store, a heat-resistant cup (Mr. Bromeliad used a large plumbing end cap), drill and matching chain.

First, glue a bail to the flat side of each stone and allow to dry. See this post on how Mr. Bromeliad made bails from jack chain


Drop some solder into your cup and heat over the stove until it melts.

Them let the solder cool a little. Try dipping in the stone, bail side into the solder.


Getting the solder to stick is tricky. If the solder is too warm, it will roll right off the stone. Same if the stone is too cold.  Just about the time you are ready to completely give up, they will start to stick nicely. (Using flux did not seem to help.)


You want the solder to cover up the bail and part of the end of your stone.


Allow the solder to cool. Then use a drill to gently open up the hole in the bail.


String your pendants on matching chain (silver in this case.)

Place in a fancy gift box.

Impress all your nieces.

Friday, April 5, 2013

My DIY jewelry bails from jack chain


This DIY is a precursor to next week's tutorial, both of which come to you courtesy of Mr. Bromeliad.

It takes some fooling around with jewelry making before you start to learn the names of things. A bail is the loop at the top of a pendant that can connect it to a jump ring or a chain. The other thing you learn about jewelry making is that pieces parts like bails don't always come cheap.

Fortunately you can make dozens of bails with a dollar's worth of jack chain. You can find silver and brass jack chain at most hardware stores.

Below is what jack chain looks like.


You can make two kinds of bails - the type that glue to the back of a pendant and the type that go down into a hole at the top of a pendant, which I think is called a pin bail.  Below you can see the DIY pin bail on the left and the glueable bail on the right.

The glueable bail is the easiest. Just separate the individual loops from the jack chain by slightly opening them with pliers.

For the pin bail, you will additionally need to open one of the loops all the way, as seen below.

Then use the pliers to cut part of the loop off, just leaving a straight "pin."

The glue-on bail goes on the back of your stone or pendant like so.


The pin bail goes down in the top of a pre-drilled hole like so.

Wednesday, April 3, 2013

DIY raw stone and crystal jewelry


Here are more than a dozen DIY jewelry projects for making your own raw crystal or raw gemstone jewelry. I'll share some of my own starting next week.

Tanya at Dans Le Townhouse has a through tutorial for creating a crystal necklace seen below using a bullet shell casing. 


She also made these clever agate necklaces without drilling a hole by modifying a craft store bail.


Carly from Chic Steals made this gold-dipped wire wrapped necklace.


I love this DIY Nallik necklace from Pacific Rain.


Emily from Delightfully DIY make this cool crystal quartz nugget necklace as a guest post at My Chic Life.


One of my favs, the gilded geode ring from Swellmayde. Not hard to do but looks fabulous.


You can't beat Natalie's tutorial from Creme de la Craft for sheer simplicity of materials for her gold rock ring.


Kim at Lovelyish used polymer clay for these chunky Adina Mills inspired rings.


Because I'm Addicted had this easy tutorial for a raw crystal necklace made from crystal beads.


Nina at Meli Melo made this wire-wrapped gemstone necklace. The instructions are in German but the photos are universally understandable.


Rachel at Transient Expression made a Pamela Love inspired spikey crystal ring.


Unfortunately Oh! created a chunky amethyst collar necklace.


Alessia from A Matter of Style made this extraordinarily blingy crystal cuff for Style.it.


Gotta include Dream, Create's DIY Pamela Love cuff again.


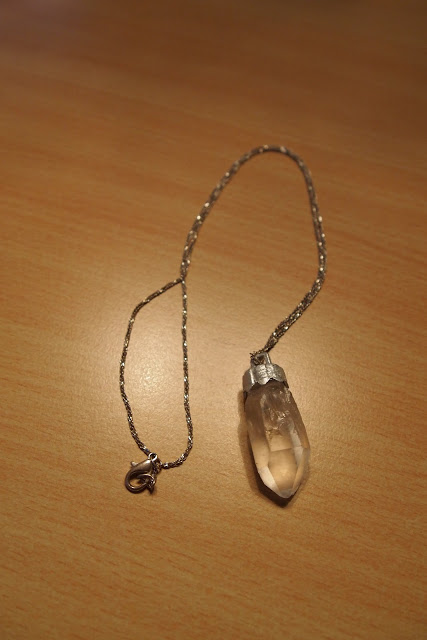
Both Style Cameleon and Burnt Feather made raw quartz necklaces using the top piece of a holiday ornament.


I found several of these via the meticulously sourced True Blue Me and You.