Wednesday, February 19, 2014

My DIY Celine inspired tote - and a giveaway


Make a DIY Celine-inspired leather tote and enter a giveaway for $50 in really great leather.


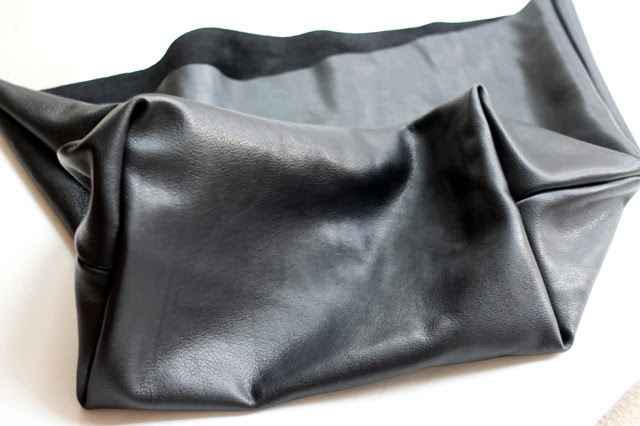
Several weeks ago Leather Hide Store contacted me about doing a project. They sent me a huge piece of luscious black leather that sat in the closet for weeks because it terrified me.

Turns out, working with leather is not so bad. In fact, it's easier to make a leather tote than a fabric one.

Here's what you'll need to make a rustic leather tote along the lines of Celine, Baggu or Cuyana. (See my earlier post for inspiration bags. )

  • A piece of thick leather about 23 inches by 28 inches and another piece about 23" by about 7". 
  • Tailor's chalk
  • Sewing machine with a needle intended for leather
  • Rotary cutter, straight edge and self-healing mat
  • A piece of thick fusible interfacing (72 or thicker) 
  • Fabric glue
  • Leather handles. (I got mine here.) 

Make a pattern piece like the one below. Inspect your leather for any flaws. (Use any flawed pieces for the inside bottom of the bag.) Fold leather in half, right sides together, and place pattern on fold line. (Credit to Between the Lines for the idea to use the fold. This keeps you from having a seam running across the bottom of your bag.)

The wrong side (the side that is not smooth and shiny) should be up. Trace around your pattern with tailor's chalk.

My chalk didn't work so I used blue painter's tape to mark my lines.


Loosely cut out your leather. Then use a rotary cutter and straight edge to cut the leather nice and clean.

Push straight down on the cutter. Roll back and forth over the same spot, kind of like a pizza cutter.


After you cut out your rectangle, mark and cut out your two notches.


Sew up the sides of the tote with a 1/2 inch seam allowance.

Box the corners and sew across the seam, as shown below.


You're already most of the way there.


I like a nice firm bottom to my bag. If you do to, then cut a rectangle of leather to fit in the bottom of your bag.

Stiffen it with fusible web interfacing. (I used two layers of 72 interfacing.) To fuse, turn the wrong side of the leather up and the shiny side of the fusing down. Put a pressing cloth over it. Press straight down with a really hot iron. Don't slide the iron around. Pick up the iron and put it back down to fuse the next section.


Glue your bottom with the interface down into the bottom of your bag. Put some weight on it and let it dry.


Position your handles and glue with fabric glue and allow to dry. Then hand or machine stitch to your bag.

Note: Baggu puts their handles on the outside of the bag. Celine puts theirs on the inside. I opted for the thousand dollar bag version and put mine on the inside.


My junk looks so much better now when toted in a REAL LEATHER tote. 


Easily mistaken for Celine, I think.


There you have it. Enter the giveaway below and get started on your own rustic leather tote.


a Rafflecopter giveaway

Tuesday, February 18, 2014

Big leather tote bag inspiration - and bargains


A big black rustic leather tote can transport your schlep from frumpy to fabulous. Imagine tucking your stuff into a supple $2,000 Celine lambskin tote. Transformative, no?

Fortunately you can DIY this. Or buy a very similar bag for about $150 or a faux leather version for less than $12.


Relish the tote of my dreams. Big, simple, spacious and on the arm of every fashion blogger. The Celine bag at Andy Heart and on Lily Aldridge at Refinery 29.


Above, the Celine tote at Damsel in Dior. Below, the Celine tote on Nikolina Fridman.


Now for some lovely bags that are not, in fact, the Celine tote. But look a lot like it.

Below is the Baggu tote in leather available at Urban Outfitters and elsewhere for $240 as seen at Kendi Everyday.  (Kendi also very often carries the Madewell Transport Tote, which is pretty similar at $268.)


And a real bargain in real leather is the Cuyana tote for $150. See it below on Krystal Schlegel.


For faux leather look alikes, consider the reversible faux leather tote for $59 at Urban Outfitters.

Mango has a similar faux leather tote for the amazingly low price of $12.

And, yes, there will be a DIY.

Wednesday, February 12, 2014

My DIY ombre macrame wall hanging


This is a simple straightforward DIY. However I managed to make a number of mistakes for your benefit. I'm generous that way. 

This post is sponsored by Tulip's I Love to Create line, which is promoting a number of neon products to brighten your winter. 

This  promotion gave me a chance to try one of my back-burner projects - a hand-dyed macrame wall hanging - for about $10. (See this post for inspiration from some real macrame artists.) 

(The neon fabric markers, paint and dye are only available at Michael's. If, like me, you've got no Michael's anywhere, you can get free shipping on neon Tulip products when you use coupon code #NeonFEB at checkout on iLoveToCreate.com during February.)

I tried the mini tie-dye. The kit contains five small squirt bottles with powdered dye. Just add water to the line on the bottle and squirt on your item. I've used the full-size bottles of this dye and can vouch for it being super easy. 

In addition to the dye, you'll need:
  • a wood dowel or stick from the back yard that's about a foot long.
  • 100 feet of white laundry rope.


Cut the rope into 10 piece that are 10 feet long. Fold in half and loop over your stick with a lark's head knot. 


Then tie a series of square knots in whatever pattern you like. You can vary the pattern by tying your knots close together or far apart.

See below for how to tie a square knot.


Stagger the knots to create a pattern.


Below I varied the pattern first with some spaced out knots followed by a few rows of knots tied more closely together. 


After about 10-12 rows of knots, give your wall hanging a haircut.  Trim the bottom of your ropes so they are even.

Put some plastic on the floor and a layer of paper towels. Spread out your macrame and then squirt on your dye. I did a section of blue and then a section of green and a section of overlap.

Wrap the hanging in the plastic and allow to sit for 6 to 8 hours. This slows the drying process and allows the dye to set.

Get excited because the dye looks booooootiful at this point (before you start messing it up.)


Here's how to not mess it up:
  • Don't overdo it with the dye. The color will wick its way up the ropes. So just dye the bottom fringe of your macrame and let it soak its way up the ropes. 
  • Hook the top part of your wall hanging so it hangs up off the floor. Allow the dyed section to lay flat on the floor. This helps the white part of your wall hanging to stay white and the dyed part to hang onto its dye. If you let the whole thing lay flat, the dye will wick its way up your ropes unevenly. If you hang the whole thing up, dye will drip off the bottom and you will lose some color. 
  • If you hang it up and have the rope kind of in a pile on the floor, the color will wick its way up unevenly. 
  • If the color is uneven, you can correct it by bleaching where you don't want color.
  • If you bleach and then hang the whole thing up, guess what! The bleach wicks down the ropes and you lose 75 percent of your dye job. 
Here's how it looked before the bleach job.


And after.


Thus I ended up with a mostly white macrame wall hanging with a wee bit of color on the end.


At this point it's best to pretend the effect is intentional and proudly pin your project, knowing that others can do far better than you.

This is a sponsored post. I received the nice Tulip products for free. All opinions and mistakes are my own. Here are some social media links:


And projects from other bloggers:


Monday, February 10, 2014

DIY macrame inspiration


Here are some modern twists on macrame that inspired this week's DIY project.

To keep your macrame from looking too hippy dippy, go with plain white white or add some crazy dye. Or, when all else fails, use black rope. Instantly cool.


Wall hanging and small white macrame with found branch from Sally England.


Blue macrame planter from Slow Down Productions. Dip dyed blue macrame from OuchFlower.


Multi-color macrame from Slow Down Productions.


Jean Gardy necklace via Refinery 29. Black macrame from OuchFlower.


Stacked macrame cuff and macrame fringe necklace from Eleanor Amoroso.