Wednesday, June 30, 2010

DIY Wednesday: Make a fabric poppy pin from scratch


As one of you correctly guessed, today's DIY is inspired by Chanel designer Karl Lagerfeld, specifically the Spring/Summer 2010 collection and more specifically the photo below, which appeared in Elle and made me fold down the corner of the page. Does no one remember this ad?


Anyway, I though the bag would be an easy DIY. Hot glue a silk poppy and some lace to a thrift-store purse and hang it from my slender Claudia Schiffer-like shoulder, and I'm set for the summer. Except a big red poppy was hard to come by, and I liked the idea of trying to make my own. Below is the Chanel poppy, which is hand-made by the venerable French company Lemarie.


And here is mine, hand-made by the upstart low-brow DIYer who runs this blog.


I made my red and black poppies from silk pocket squares, which, if you're local, can be purchased at The Baltic Bazaar thrift shop for a buck. The white ones came from a ripped men's dress shirt.

You'll also need some black felt, some felt that matches your flower color, heavy black thread, spray starch, fabric glue, hot glue (optional), a pin back, scissors, needle and sewing thread (optional). You'll also need some pieces of thin plastic from the recycle bin. I cut mine from the lid of a strawberry container.


To stiffen and add texture to silk or other lightweight fabric, spray the fabric with heavy starch, twist and clip. (If your fabric is heavier, like cotton, you can add the wrinkles later.)


When the fabric is mostly dry, untwist it. If it is too wrinkled to lay flat, spritz with some more starch and stretch it.


Cut out 12 to 14 petals. You can freehand them or use this template for the petals, center and back.


Cut a piece of plastic about 1/2 inch wide and about three inches long. Wind the heavy thread around the strip. Spray with starch and allow to dry.


Stack your petals and either sew or glue them together, fanning out the petals as you go to avoid any "bald spots."


At this point, if you are using a heavier fabric, you can add your wrinkles here. Spray lightly with starch and fold the petals up like a bud. Hold loosely with a rubber band and allow to dry.


Now we'll put together the back of the brooch. Cut a small circle out of matching felt and thin plastic. Glue to the back of the flower and top with a pin back. Allow to dry.


Flip the flower over and glue a smaller black felt circle to the center of the front.

Now for the fun part - making the eyelashes. Slide the thread off the strip of plastic. You can do a little at a time and cut the thread or do it all at once.


Dip one edge of the thread in fabric glue. (I don't recommend hot glue because it hardens too fast.)


And place along the edge of the felt.


Your flower is done.

Alternately, you could buy a silk poppy, which is on sale for $1.68 at Pier 1.

Come back next week when I will drag this project out to a second post and we'll talk about ways to use your pin and also clogs. (Yes, they are back.)

Tuesday, June 29, 2010

DIY inspiration


Here is the inspiration for tomorrow's DIY project. Anyone recognize the designer and/or fashion house?

Wednesday, June 23, 2010

Foiled again


I almost got my hands on this lamp, Pottery Barn's $250 Architect's Floor Lamp. Actually the $63 version below from overstock.com, which I found via Copy Cat Chic via Casa Sugar.


It had everything I wanted. Double jointedness. A cone-shaped head. Industrialness. Overstock warned me the sellout risk was high. I dithered. I dillied. I dallied. I decided. And Overstock was out of stock.

Instances of similar behavior are here and here and, oh yes, here if you can bear to look. (And this is not counting the aluminum tables I dragged to the checkout and back and then bought, which post back in February included a long treatise over lighting options.)

Sometimes it's just exhausting being me.

DIY Wednesday: Faux metallic figurines


Today's project comes from the stylish DIY blog P.S. I Made This. If you though used toys were suitable only as subjects of three-part Pixar animated features, think again. Erica Domesek took an assortment of toys, gave them two coats of Krylon metallic paint and had herself a bunch of metallic accent pieces.

My favorite was the alligator.

Get the full tutorial here. Stop back next week for a tutorial of my own.


Tuesday, June 22, 2010

Only in New York


. . . Can you take an evening stroll in the park and come across a piano

. . . that is more colorful than you even though you are wearing pink and purple ikat

. . . and friends with friends visiting from Paris who happen to have sheet music on them

. . . which includes a song you sort of know

. . . and everybody sings along

. . . and dolphins frolic in the water.

(I made up that last one.)

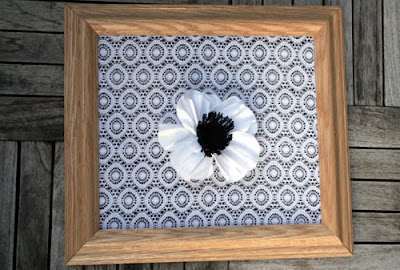
Giveaway winner: Lace frame jewelry holder


Our winner for the lace frame jewelry holder with an alleged retail value of $48 is Michele P.

Congratulations, Michele. I'll E-mail you for your particulars.

Friday, June 18, 2010

What's Your Style in One Picture?


Ally over at From the Right Bank is hosting What's Your Style in One Picture where you get to post an image that, in a single sweep, represents your home design style.

Last year I posted a bedroom with nothing in it. This year, I'm posting a bedroom with nothing in it. So much for evolving style. I remain:
  • minimalist
  • fond of gray
  • rustic and
  • a touch global
In my dreams I also live outdoors or at least along a bank of enormous windows with a view of the sea.

Image: Marie Claire Maison

Wednesday, June 16, 2010

DIY Wednesday: Make a felt suzani pillow


Remember that envelope pillow we learned to make two weeks ago? Here is where we get to do something interesting with it.


Many of you may remember the home of New York artist Anne Becker, featured in Elle Decor. Check out the suzani on the love seat. I took the colors and shapes directly from this photo and reintepreted them with felt.

I'm currently at work on a full-sized suzani. In the meantime, I've uploaded all the templates needed to make the suzani pillow pictured above.


I'm most proud of the suzani wheel template. You can get it here. The fuchia circle and small pieces are here. The smaller pink circle is here.

Cut the pieces out of felt or other non-fraying fabric. Then center the two flowers and, using fabric glue, attach the small one to the larger one. (If you're ambitious, you can applique the pieces. However, fabric glue works pretty well with a thick fabric like felt.)


Center the combined flower on to your pillow cover and glue.


Center the white wheel. Fold one side up to apply glue and then lay it back down. Do the same with the other half.


Add one small flower to each corner and position the yellow flourishes on either side.


Allow glue to dry and check for any loose spots.

p.s. Don't forget the jewelry frame holder giveaway, which is ending soon.

Tuesday, June 15, 2010

DIY acrylic storage trays


As mentioned yesterday, I've been craving lucite storage. This is because lucite or acrylic allows you to see through the storage and examine your loot. This is also because I'm a 70s child who loves shiny plastic things.

Acrylic storage doesn't cost much, but I challenged myself to find acrylic storage that costs nothing at all, and I succeeded. Can you guess what my stacking trays are made from?


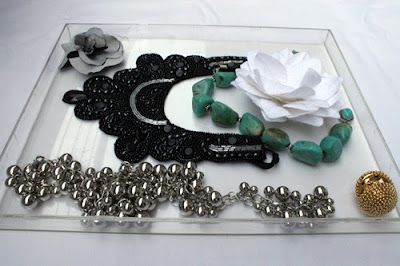
In its former life, my big tray was the World's Ugliest Artwork (I may like 70s plastic but I do not care for 70s photography). This plastic box frame shown above was being tossed.


I pulled the photo and cardboard filler out of the back and had myself a tray.


The two small trays started out as a candy box. Someone ate the candy without sharing and tossed the box, which I pulled from the recycle bin. I peeled off the label and had what you see above.


The big tray became home to some of my favorite necklaces and pins.


The two smaller trays display some of my massive pin collection, organized by color.


Stacked, they still reveal what lies beneath.

Have you upcycled anything good lately?

Monday, June 14, 2010

Affordable acrylic storage


Since cleaning up my closet, I now have a craving for bright clear lucite trays and boxes for storing my growing jewelry stash. Above is an acrylic tray from Stacks and Stacks, recently featured in Real Simple.


Two options above from The Container Store: Stacking Acrylic Trays ($5 to $12) and Shallow Trays ($8 to $13)

IKEA has a new line of acrylic storage called Godmorgon, which ranges from $8 to $15 and includes these neat drawer dividers.


Then there are small compartment trays like this one at Stacks and Stacks for $18. One of my favorites - cb2's format tray for $35.00. Just think of the joolz you could spread out in here.

Tomorrow I'll show you my 100% free DIY acrylic storage.