Monday, January 19, 2015

Big Brother labeler giveaway and decorative storage tutorial


Attention all (non-medical) OCD friends. January is National Get Organized Month and Brother is giving away a label maker every day along with a $2,000 grand prize package. Enter here.

If you haven't fallen in love with the coolness of owning a label maker, here's an idea to get you inspired. One of my favorite organizing tips is to hide storage in open sight by making it "pretty." So I'l show you how to make decorative silver storage cans, which you can see above in my fabulous closet.

I created this tutorial as part of a paid campaign with Brother and Blueprint Social. The opinions in this post are my own.

First you'll need a label maker. Brother gave me the PT-D200 to try, which has extra decorative text features. You can check out the full line here.

You'll also need a couple of small plain paint cans, which I picked up at a hardware store for $1.50 each.

Make a label "ribbon"  by repeating the text of your label over and over until you get the message that the text capacity is full. Optional: I put a space between each letter and two spaces between each word to air out my font.

Fortunately, the maximum label length fits exactly around my small paint can. You'll need four or five labels per can.

Then peel and stick your labels on the cans as seen below. Start on the back seam of the can and work your way around.  Slightly stagger your starting point so that the text is staggered from line to line.


Then take the contents of your junk drawer and put it in your pretty cans..

The cans look nice enough that you can leave them out on a desk or tray.


Here are more organizing projects using Brother label makers.


Sunday, December 21, 2014

Make DIY geometric bangle bracelets


Make these modern geometric bracelets quickly and easily with only three supplies.

This tutorial was created using supplies from ConsumerCrafts. I'm guest posting at ConsumerCrafts DIY blog Crafts Unleashed so be on the lookout for more jewelry projects in the coming months. 

These bracelets are made using oven-baked clay, which is a new item for me. So I kept it simple.

To makes project, you'll need:
  • A ball of Sculpey or similar clay about the size of your fist
  • Acrylic paint or spray paint
  • Something to seal the paint like Mod Podge.

Useful tools are a straightedge, a knife and small vase or glass with a mouth that is as wide as your wrist. (Tip: Find a bangle bracelet that fits you and compare the inner dimensions to the mouth of your vase to see if your vase will work.)


Step 1: Knead the clay until it is pliable. Roll it to about 1/3 inch thickness. (I used a glass vase as a rolling pin.) Make an imprint for the inside of your bangle using the mouth of the vase. Don't cut it out yet.


Step 2: Using a straightedge and a knife, cut five asymmetrical sides.


Step 3: Press the vase down all the way to cut out your center circle.


Step 4: Bake your bangles according to the instructions on your Sculpey package.


Step 5: Sand down any rough spots. Wipe with a damp cloth.


Step 6: Paint your bangles with spray paint or acrylic. (I think spray would give a smoother finish.) Lightly sand between coats.


Step: 7: Seal with Mod Podge or similar product


Step 8: Wear a whole stack for a modern minimalist look.

Tuesday, November 11, 2014

When good crafts go bad


I received this adorable little book in the mail as a review copy and then promptly and mysteriously got black marker on the cover. Four days past deadline, two photo sessions and much dabbing in Photoshop later we have a review of sorts. CraftFail by a craft failure. Wha wha wha.

But it's OK. My idea for my pin-friendly top-of-the-post image got replaced with something else that ended up maybe being better. And that's the message of CraftFail: When Homemade Goes Horribly Wrong by Heather Mann. You failed because you're a beginner. Because you probably don't have an aptitude for this. Because you even tried.

"In my eyes, craftfails are beautiful because they are tangible evidence of the learning process," says Mann, who many of you may know from her mega blogs Dollar Store Crafts and CraftFail. "I value my ability to fail - it's the most important thing I've taken 30 years to learn."

CraftFail the book is page after page of awful, hideous, horrible crafting.  Exploding food. Dripping paint. Obscene shapes. You may say, 'But Sam, why spend $10 on a book of ugly when I can float in the visual bubble bath of Pinterest every day for free?'

One simple reason: it's hilarious. LOL where LOL means what it stands for. I had to read this book in the toilet so my husband could hear the essential plot details of Law & Order without interruption.


The idea of good crafts gone bad could wear after awhile yet the book stays funny from beginning to end, all the way from Craparons to Napalm Cake in a Jar to Turdy Pavlova (a craftfail I have personally nailed as well). The real skill here is not in the crafting, it's in Mann's writing. She should receive some sort of award just for alliterative titles. The book is even funnier than the blog.


CraftFail is to Pinterest what Traveler Photos are to TripAdvisor - real people demolishing a perfectly styled and professionally photographed version of reality.


There's even a section devoted to the Queen of Craft Martha Stewart. Did you know it's possible to totally mess up a tissue paper flower? Consider yourself warned.


But Craftfail isn't all fun and games. Along with the fails, you also receive tips on how to actually execute those ridiculously popular DIYs like water marbled nail art or the Sharpie mug.

I was going to host a giveaway of my review copy but I like it too much to give away. Plus, it has marker on the front.

Sunday, October 12, 2014

50 DIY ideas from Fashion Month S14


So much inspiration, so little time to DIY. The runways alone yielded more than 50 ideas from spring fashion weeks in New York, Paris, London and Milan.  And we aren't even talking street fashion.

The advantage of getting your inspiration from the high-end world is that you can make something affordable, cool and trendy before it shows up at your mall costing even less and worn by everybody. 

This season, I am saving myself and you the trouble of me sticking all the ideas in a blog post so you can pin them. Instead, I will direct you to my handy dandy Pinterest board 50 DIY ideas from Fashion Month Spring 2015. There's everything from raffia to - no joke - Perler beads going on this year. 

Friday, August 15, 2014

DIY party fruit and a $50 Dollar Tree giveaway


Make a healthy summer party treat using my version of a project from Dollar Tree's Value Seeker's Club.

Get the details and enter a giveaway for a $50 Dollar Tree gift card at Dollar Store Crafts. Fifty bucks goes a long way at a dollar store.

Sunday, July 6, 2014

Make a DIY perforated clutch


This is my kind of DIY. Super easy. Super cheap. And on trend. (See yesterday's post for why you need something perforated right now.)

Can you guess what this clutch is made out of?

Guess, guess, guess.

Give up?


Dish mats. Yepper. Pick up two white dollar store dish mats and glue them together. That's it, basically. I tried to make it harder but it didn't come out any better.

Use good glue, like 5-minute epoxy or E6000 glue. Glue three sides of your clutch.

You can add a magnetic purse clasp to the top or embellish in other ways.


You can slide in your phone, your beach reads and your sunnies. If you get sand in your DIY clutch, just put in the sink with the dishes.

I created this tutorial for Dollar Store Crafts.


Saturday, July 5, 2014

DIY inspiration - perforated fashion


One of my favorite trends this summer is the whole perforated look - eyelet, mesh, laser cut, lattice look - whatever you call it. With the humidity the way it's been, everybody could use some ventilation.


Perforated and mesh outfit inspiration from  Arc LineAtlantic-PacificA House in the HillsStyle Lovely and Tory Burch.

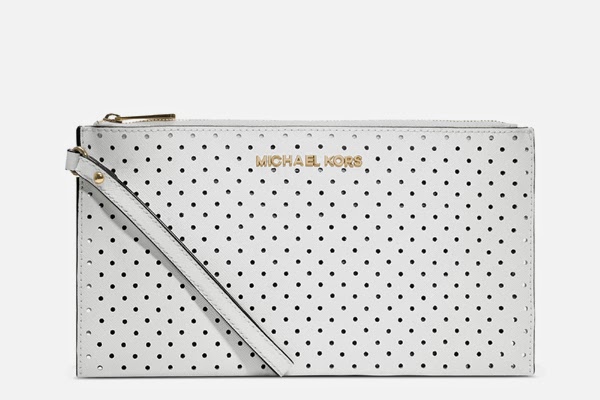
Inspiration perforated clutches by Stella McCartney, Alaia, Michael Kors and Topshop.