Friday, October 11, 2013

DIY inspiration from Fashion Month S14


Here are nearly 30 DIY ideas from London, Milan and Paris fashion week spring 2014 collections plus a few stragglers from New York Fashion Week.


Add fur to any accessory, a la Fendi. Or take any large metal object and make it into a belt buckle.


Embellish a cuff with oversized rhinestones or make a perforated clutch.


Add rhinestones to a clear vinyl poncho like Burberry. Or turn your old phone cord into a necklace like Kenzo.


Supersize some earrings.


Make your iron-on transfer sweatshirt hip with sharks or botanical diagrams like Christopher Kane.


Add scattered rhinestones or brooches to a dress or coat like Burberry. Add one bright feather like Thomas Tait.


Paint your wedges with stripes.


Make a skirt out of shiny vinyl like Dolce and Gabbana. (Or almost anything out of gold coins.)  Use enormous beads like Armani.


Make a toucan clutch. Add two huge beads to a collar necklace like Chanel.


Make a mesh cuff (I'm on this one already.)


Try an asymmetrical cape. Paint a golden shoe on your plain black clutch.


Make a clutch with a message.


Use that spare clear vinyl to create a hat like Hussein Chalayan. Add fringe to your denim.


Double wrap a chain and add a single pendant like Valentino. Forget the fanny pack. Attach your clutch to your forearm like Undercover.


Make furry rings like Fendi. Or a fabulous necklace like Vivienne Westwood.


Or make a kitty ring.

And last but not least - in the category of You Could DIY This But Probably Shouldn't . . .


The teddy bear hat and collar from Moschino.

Have you seen anything at a fashion week you plan to try?

Tuesday, October 8, 2013

Al fresco autumn


The perfect autumn snack would be jewel-like figs drizzled with honey and served with manchego cheese and crusty bread.

Serve outdoors on an unseasonably warm day.

Heaven.

Friday, October 4, 2013

My DIY quick, cheap and easy pillows


Here's my shimmery silky watercolorish ikat pillow. It cost me a buck to make.

Like a lot of my pillow covers, it started out as a shirt. With my DIY batik pillow and my DIY no zipper shirt pillow, I tried to use existing seams or buttons to avoid work.

However, if that's not an option, you can still make a pillow pretty quick using my method below.


This pillow started out as a large thrift store shirt with poor construction but interesting fabric. The pillow form was a needlepoint thrift store pillow covered with tie dye fabric covered with batik fabric. Awhile back I gave up on zippers. If I want to change my cover, I just sew a new one right over top of the old one.


Step 1 above, cut two rectangles the approximate size of your pillow plus a few inches extra. Put the right sides of the fabric together. Sew two of the seams like an "L" shape as marked in the first photo.

Step 2 above, pull the fabric over your pillow form and pin fit the long seam.

Step 3, pull the fabric off the pillow. Sew along your pin seam, removing pins before you get to them. (Don't sew over the pins.)

Step 4, turn the cover right side out and slide onto your pillow. Fold the raw edges under and hand stitch the short seam closed.


Here's a tip: curve the corners a bit when pinning your seam. This keeps your pillow from having weird poked-out corners.


I had enough shirt fabric for a bed pillow.


And a chair pillow.

You can also make a pillow from a coat and from a skirt.

Thursday, September 26, 2013

Real New York street style and an anniversary


Here's a little real life New York street style. No fashion week. No SoHo neighborhoods. Just regular people looking sharp. For our 19th Anniversary we took a day off to just walk around Manhattan. Always good cheap entertainment.
 
Love the statement necklace above.


The African print above incorporates dollar signs and euro signs.


Ecumenical tattoos.

 
Little kids are pretty good at mixing prints. On the right, these girls were mock ballet dancing to the opera music being piped outside of Lincoln Center. They managed to make tennis shoes, knee socks and plaid work really well.


And then there are your random celebrity encounters. We met Mayor Bloomberg on the East River ferry. Apparently he appreciates a $4 boat ride as much as we do.

Monday, September 23, 2013

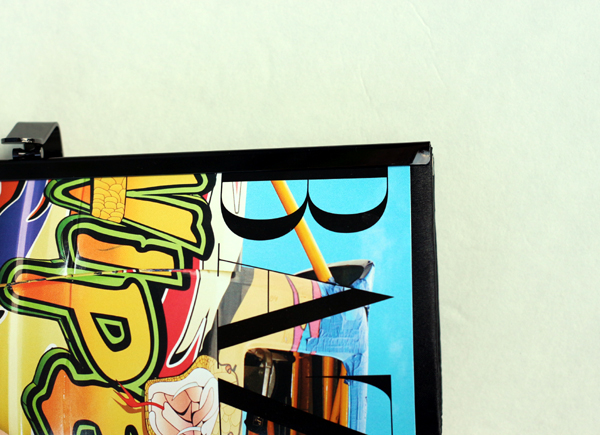
My DIY Darby Smart magazine clutch


One of my first posts to Bromeliad back in 2008 was about the dumbness of craft kits.

Above, you see the results of, yes, a craft kit. 

In general, I still think craft kits are dumb. Except this one.

The kind people at Darby Smart asked me to try one of their new DIY kits on the house, and I immediately dived for the magazine clutch.  I've been wanting to make one for years but lacked a clutch form.

The kit came in a cute blue box and included instructions, a fabric clutch, superglue, a little bottle of Mod Podge, a foam brush, and a current issue of Vogue - everything you need in one spot for less than it would cost to buy all this stuff separately.

The Vogue cover featured Kate Upton, who is adorable in general but involved too much cleavage for me in this specific instance. I instead chose a favorite issue of Harper's Bazaar.


After opening the box, I lost the instructions and the photos I took of the cute unopened box. But it's pretty simple. Trim the magazine cover, superglue it to your clutch and Mod Podge the cover.

For extra credit, I tucked the edges of my cover under the metal trim of the clutch.


The Mod Podge left brush marks. My friend Donatella at Inspiration and Realization overcame this by painting a second coat in the opposite direction for a leather-like look. I subjected my clutch to five coats of Mod Podge clear acrylic sealer. Below you can see the brush marks toward the left and the smoother sprayed surface toward the right.


It came out looking shiny and not remotely like a magazine cover glued to a purse. I probably could have skipped the Mod Podge all together since my magazine cover paper was already coated.


I especially like that this little clutch includes a chain.

Overall I liked this kit because it was practical but still allowed for creativity. Darby Smart sourced a clutch shape I was unable to find on my own at a price that made sense. Yet, I also could personalize the clutch to my tastes. (My main problem with DIY kits is that they cost too much and require zero creativity, which pretty much eliminates the only two purposes of DIY.)


Do you have any opinions about craft kits, pro or con?

Monday, September 16, 2013

DIY Inspiration from New York Fashion Week


New York Fashion Week is over. London's has already started. I've saved you hours of tedious scrolling through fabulous fashion from the streets and runways to bring you more than a dozen DIYable designs.  I'm so good to you.

Above, check out Tory Burch's DIYable beaded ring (and beaded necklaces and sandals.)


Make a faux furry envelope clutch.


This is the second year I've wanted to make a holographic silver clutch. Forever 21 hasn't knocked this one off yet, so maybe I will still do it.


Coiled wire necklaces at Altuzara (not to mention a DIYable graphically trimmed poncho top.) Crystal tipped necklaces at Edun.


Wear a shirt with a shirt.


Go for oversized beads or knotted cord necklaces like Josie Natori.


Or try her oversized chains in many colors.


Applique your wedges.


Make a washer necklace like Kate Spade (or stencil metallic paint onto a plain clutch.) Pretend like you've got giant pinking shears and zig-zag trim a jacket like Milly.


You can so do a glam ear cuff. Check out Swellmayde or Honestly for a tutorial.  (Images via Style.com and Fashionologie.com.)

Did you find something inspiring in the Spring 2014 collections or on the street?

Wednesday, September 11, 2013

Zinnia


Late summer zinnias become a still life in an enameled jug.